
1. Installing Blender
To Install Blender, download the latest version from Blender.org/download, as well as the latest version of our Blender Add-on.
Run the installer for Blender and open to the "general" workspace.
From there, click on edit in the toolbar, then choose preferences. In the preferences window select the Add-Ons Tab, then choose install Add-On.
Browse to your downloads folder and select the add-on. Note that this should remain zipped and does not need to be extracted.
Once you've installed the add-on, enable it by clicking the check box and then click the small drop-down arrow to the left to expand the menu and click the red install dependencies button. This will allow the add-on to communicate with HoloPlay Service and enable the live preview features.
2. Using the Blender Add-On
Now that you've got the Blender Add-on Installed let's go through a few of the features you can use! Let's start by going over the User Interface.
User Interface
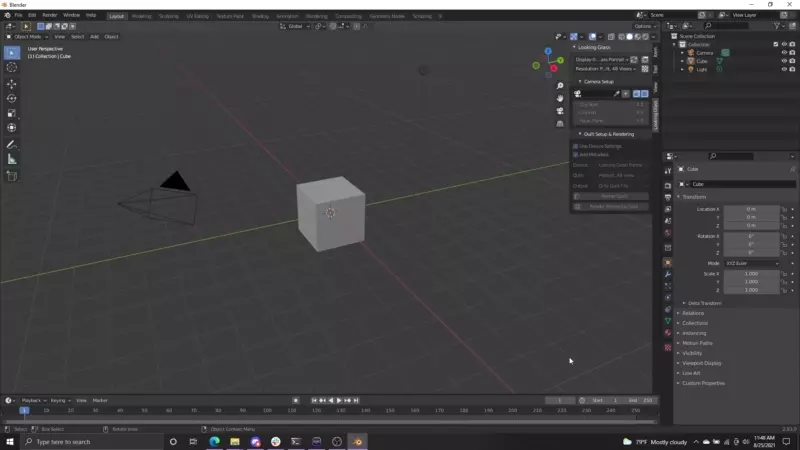
At first glance, it will look like nothing has changed, that's because the UI for the add-on is in blender's hidden menu bar. To access the UI select the small arrow next to the orbit gizmo and the scene outliner.
Once you've expanded the UI toolbar you'll see a handful of tabs, like items, tool, view, and most importantly for us, Looking Glass!
Select the Looking Glass tab and you'll see all the cool UI options present to use!
Now for the coolest part! Click on the eye dropper icon, and select your camera in your scene. Presto! You've now got a Looking Glass Capture volume! You can adjust the focal plane, near clip and far clip planes to best suit your model or scene.
To show your model in the best light you should adjust the focal plane so that it intersects the model, as shown in the video. This will give the best result while keeping your model in focus and sharp.
Live Preview
The settings for Live Preview are available at the top of the UI panel, you can change them between a variety of presets. The one you'll want to use depends on how large/demanding your scene is. Feel free to experiment here! To activate the live-view select the small square button next to the refresh button.
💡 Note: The Live preview viewport currently doesn't have proper color correction; this will be fixed in an upcoming hot fix release for Blender 2.93.
Rendering Quilts
To render out quilts simply set your rendering destination, just like any normal blender rendering, and click the Render Quilt button. This will automatically start rendering out the views in the quilt and once finished it will stitch them all together!
Rendering Tips
Rendering content for the Looking Glass can be demanding depending on which renderer or how heavy your 3D scenes are. For cycles we recommend using a lower number of samples with denoising turned on. Denoised images are almost identical in quality to high sample count renders and render out much faster than normal since you can lower the sample size to something like 32 samples for super quick renders!
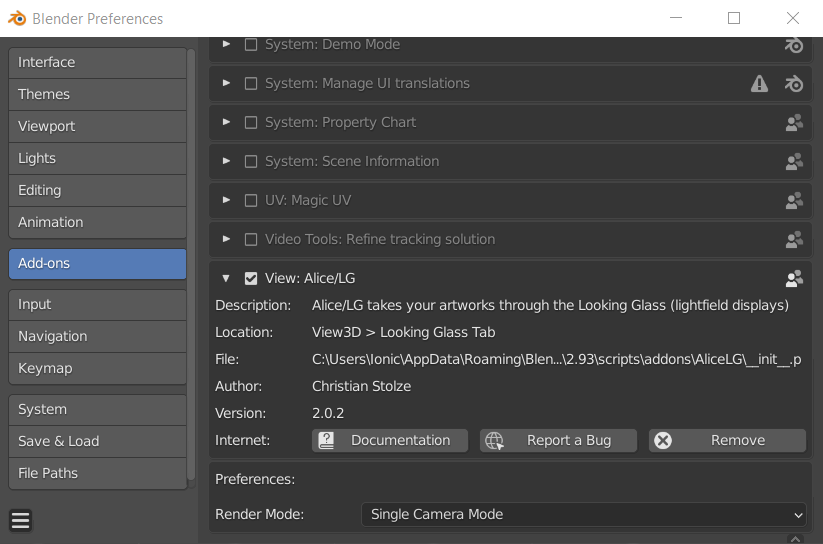
It can substantially improve rendering times if you use the Multi View Camera Mode. This option is available in the addons menu after it is installed. Go to Edit -> Preferences -> Addons then select the Alice/LG Addon. Open the drop down and switch from Single View Camera Mode to Multiview.
3. Rendering Quilt Animations
To render out quilt animations set your timeline duration and click the Render Quilt Animation button. This will render out a quilt as a .png file for each frame.
💡 Note: There is a current limitation with blender's eevee renderer in that it will slow down after ~100 frames. This can be resolved by restarting Blender.
In order to view your quilt animation in HoloPlay Studio or share it with your friends/followers you'll need to compile those frames into a video.
You can do this directly in blender if you'd like! Open Blender and select the "video editing" preset. This will open a full video editor!
Change the resolution to match your quilt resolution, typically this will be 3360x3360 for Looking Glass Portrait. You should check this first by right clicking one of the frames you exported and checking its dimensions.
From there you can go to the timeline, click "add" and choose image sequence. Select your frames that you've just finished rendering and import them.
To render out a video, you'll need to change the output settings from png to ffmpeg video, set the container to .webm and set the codec to .vp9 with the encoding quality set to high quality.
Once you've done that, go to the render button in the top tool bar and select render animation. This will encode your quilt frames into a video!
We're always excited to see what you're making!
If you have any questions, please reach out to us! You can reach the team at Looking Glass Factory at developer@lookingglassfactory.com!
Share with us your blender holograms, either in the Discord, or by tweeting and tagging @lkgglass